Widefield Epifluorescence Microscopy
Techniques, Vs Confocal
Overview
Essentially, epifluorescence microscopy is a method/type of fluorescence microscopy. As such, it functions by transmitting a specific wavelength of light (excitatory light) in order to excite electrons in a sample ultimately releasing a light energy (fluorescence) that makes it possible to study the sample.
Using widefield epifluorescence microscopy, it has become easier for researchers/technicians to identify different cellular components and examine impurities etc with high specificity (and contrast).
For this reason, widefield epifluorescence microscopy has become one of the most widely used techniques in life sciences (within the biological and medical field). With technological advancements of mirrors, filters, and cameras, etc used in microscopy, widefield microscopy has continued to exhibit superiority in such areas as high speed of image acquisition and providing three-dimensional structure information of various cellular structures among other advantages.
Some of the main components of widefield fluorescence microscopes include:
- Light source (LEDs)
- Beam splitter/mirror
- Camera
- Filters for incoming and emitted light
- Objective lens
Fluorescence Microscopy
A fluorescence microscope can be described as a microscopy technique similar to a conventional light microscope with a number of added features. For instance, whereas conventional microscopes use visible light in the range between 400-700 nanometers, fluorescence microscopy techniques require high-intensity light sources to excite fluorescent species in a specimen.
This allows the microscope to detect a variety of particles (e.g. neurotransmitter amines) with a resolution below that of conventional light microscopes.
In this set-up, the sample (labeled with a fluorophore) is illuminated with a high energy source through the lens. Therefore, the light passes through the objective lens first before reaching the specimen.
Here, however, it's worth noting that the light is first filtered (by the excitation filter) before being allowed to pass through the objective lens. This ensures that only the radiation with a given wavelength is allowed to pass (light with a wavelength corresponding to the fluorescing material).
Once the desired excitation light reaches the specimen, it comes in contact with atoms and excites the electrons to a higher energy level and ultimately allows emitted fluorescence to be detected.
* Apart from proteins fluorophores, fluorescence microscopy also uses dyes and fluorescent probes (quantum dots).
Epifluorescent Microscopy
* The word "epi" comes from the Greek word that means "same" - This refers to illuminated and emitted light traveling through the same objective lens.
As previously mentioned, epifluorescence microscopy is one of the most common fluorescence techniques in use today. This is because, in addition to being a simple fluorescence microscopy method, it also offers a number of benefits in biological and medical fields.
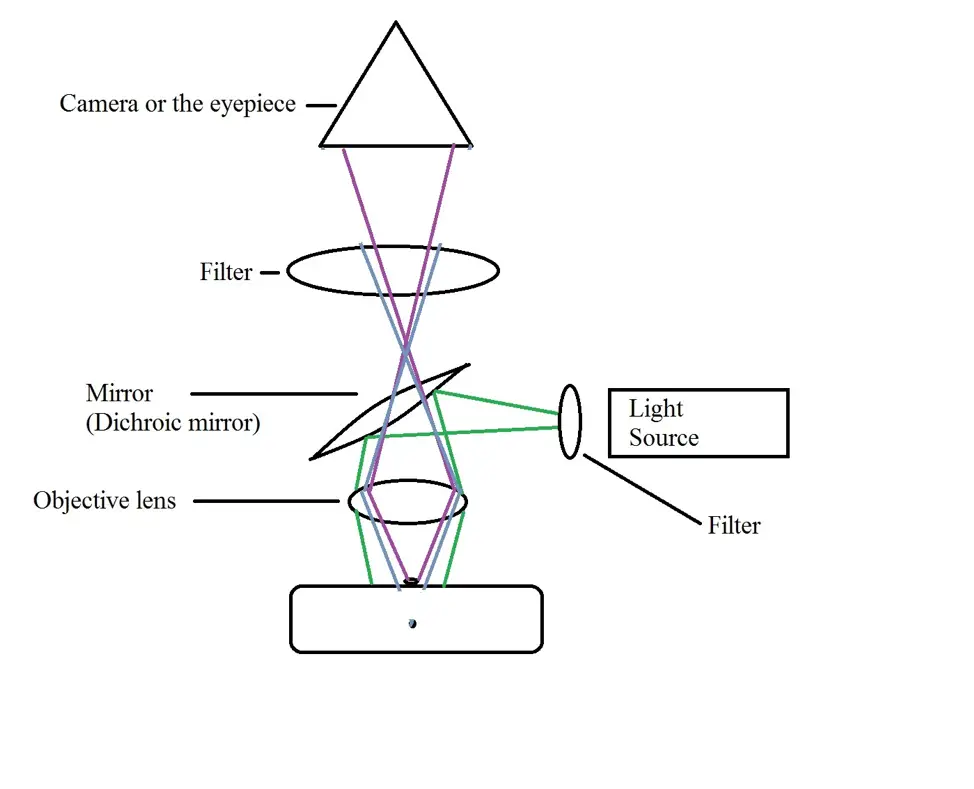
The following is a diagrammatic representation of an epifluorescent microscope:
As with other fluorescence microscopes, light from the light source (excitation light e.eg. from a mercury lamp) has to pass through a filter before it reaches the dichroic mirror.
This filter is known as the excitation filter and is meant to only allow a narrow band of wavelength that is closer to the excitation wavelength of the fluorophore. The MF497-16 is a good example of an excitation filter.
* The excitation filter to be used is dependent on the peak fluorescence excitation wavelength.
* The excitation filter is also referred to as bandpass filter. By allowing wavelengths that can be absorbed by the fluorophore, it also prevents or significantly minimizes the excitation of other sources of unwanted fluoresce.
The desired wavelength of light is then passed to the dichroic mirror. This serves to control both the excitation and the emission light. From the dichroic mirror, light is directed to the objective lens (located below the mirror) which in turn transmits the wavelength of light to the specimen. In the image above, the green lines represent the excitation light.
Once the light reaches the specimen, a photon of UV radiation collides with an atom which in turn excites and elevates an electron (of the atom) to a higher energy level. The electron then relaxes to a lower level which results in the emission of light. This light is in the form of a lower-energy photon. As compared to the excitation light, the fluorescent light (light emitted from the specimen) is characterized by longer wavelengths, a phenomenon known as Stokes shift.
* Here, the primary aim of the microscope is to ensure that the excitation light irradiates the specimen so as to separate the fluorescent light (weaker light emitted) from the excitation light which is brighter. As a result, it is only the emitted light that reaches the eyepiece/camera.
* In fluorescence, time interval between absorption (of the excitation light) and emission (from the specimen) is extremely short.
* The emitted light might either be in focus or out of focus. In the image above, in-focus light is represented by purple lines while out of focus light is represented by blue lines.
From the specimen, the emitted light then passes through the objective lens and dichroic mirror onto the emission filter. As compared to the excitation filter, the emission filter ensures that only the wavelength that was emitted from the fluorophore in the sample pass through.
In doing so, this bandpass filter prevents any other light from passing through. This is particularly important because by blocking the unwanted light (e.g. autofluorescence from the sample or the system), it ensures the darkest possible background to contrast the desired emitted light. From the emission filter, in-focus emitted light reaches the eyepiece/camera where the image is captured.
Upright Vs Inverted Epifluorescence Microscope
A fluorescence microscope may be inverted or upright. For an upright microscope, the objective lens is placed above the stage. In an inverted microscope, on the other hand, the objective is located below the stage.
While the same quality of the image under investigation can be achieved using either of the two microscopes. There are some minor differences between the two microscopes. For instance, whereas inverted microscopes are often used for imaging live cells, upright microscopes are typically used to observe fixed cells/tissue sections.
Confocal Microscopy
As mentioned, is the simplest form of fluorescent microscopy that relies on simultaneous illumination of the sample in the field of view in order to detect fluorescent light using such light sources as a mercury lamp.
A confocal microscope, on the other hand, uses light emitted by a laser for fluorescence emission. Apart from the different light sources, the manner in which light is transmitted is different between the two techniques.
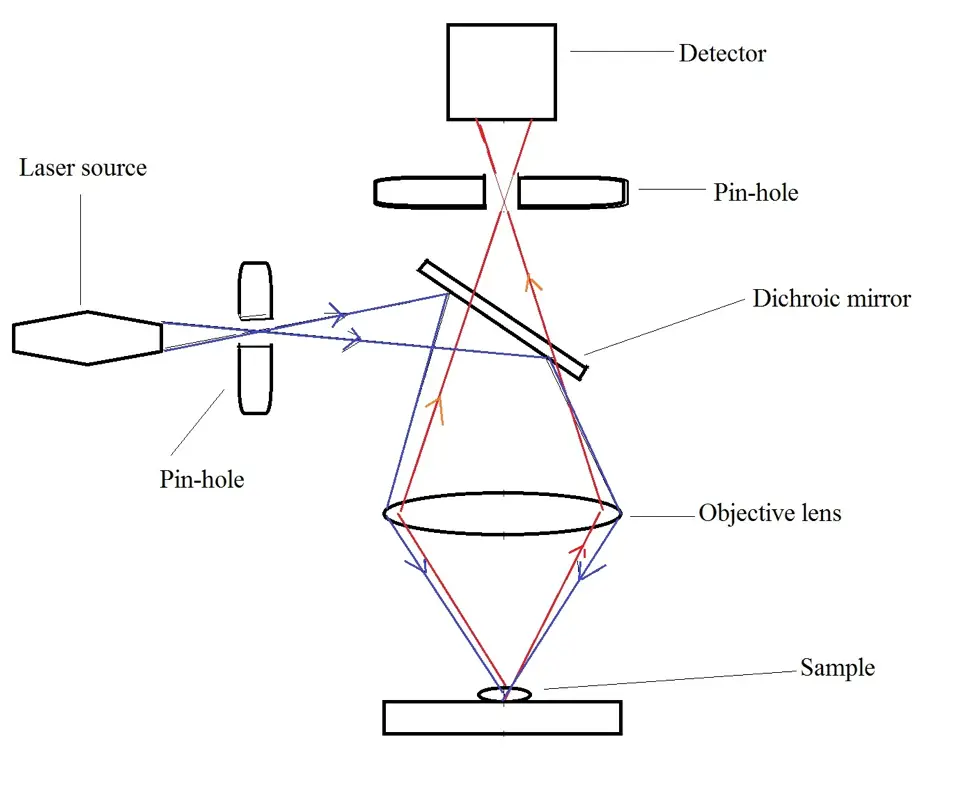
The following is a diagrammatic representation of light pathways in a confocal microscope configuration:
In a confocal microscope, a laser system acts as the excitation source. As such, it emits a coherent light which passes through a pinhole aperture situated at the conjugate plane before reaching the dichromatic mirror. The laser is then reflected by the mirror and directed towards the specimen in a defined focal plane where a secondary fluorescence is emitted.
In a similar fashion to widefield epifluorescence microscopy, the fluorescence is then emitted from different points of the specimen along the same focal plane and focused at the detector pinhole aperture before reaching the photomultiplier detector.
* Here, it is worth noting that like in widefield fluorescence microscopy, the confocal principle may also employ the use of filters used in fluorescence microscopy (an excitation filter as well as a fluorescence barrier filter). Here, these components serve similar functions to those found in wide-field fluorescence microscopy. For this reason, the technique is sometimes referred to as epi-illumination scanning confocal microscopy.
In a confocal microscope set-up, the scan head is at the heart of the system.
It consists of the following components:
- External laser sources
- Dichromatic mirrors
- Pinhole apertures
- Photomultiplier
- Fluorescence filters
- Raster scanning mirror system
Apart from the laser sources in confocal microscopy, the pinhole apertures are some of the most important parts of the microscope. The first pinhole aperture (light source pinhole aperture/illuminating aperture) is located between the light/laser source and mirror.
Also known as a spatial filter pinhole, this pinhole is conveniently incorporated into the beam expander which helps produce a uniform illumination beam. Typically, the ideal size of this aperture is relatively large compared to the size of confocal aperture needed to achieve true confocal operation.
Light from this aperture is then reflected by the mirror and directed to the sample/specimen which in turn, produces the secondary fluorescence. From the specimen, the secondary fluorescence is first collected by the objective lens before reaching the mirrors (galvanometer mirrors) where it is descanned (fluorescence emission passes through the galvanometer mirror system towards the detector).
From here, the light may pass through emission filters (barrier filters) and consequently reach the second pinhole aperture (confocal aperture). Apart from the barrier filter, this aperture plays an important role in excluding out-of-focus fluorescence signals (emissions that do not originate from the focal plane) to ensure that only the signals from the illuminated spot enter the detector.
It is worth noting that in this set-up, the whole sample is not illuminated at once. Rather, the laser light is controlled in a manner that ensures that only a given spot at a specified depth within the specimen is illuminated.
As a result, fluorescent light is only emitted from this point. The out-of-focus signals from the features located above/below the focal plane are excluded from passing through the aperture thus only allowing a small fraction of light to pass through.
* By rejecting the out-of-focus and stray light, the pinhole contributes to the high signal-to-noise ratio of the images produced.
As compared to widefield microscope, images in this system are formed by scanning a focused beam across a given area in a raster pattern. Here, the scanning process is controlled by high-speed oscillating mirrors with one mirror moving the beam along the x lateral axis while the other directs the beam in the y-direction.
During scanning, fluorescence emission is collected by the objective lens and passed through the optical system before reaching the detector. Once the emission passes the pinhole aperture, it has to be converted into an analog electrical signal by the photomultiplier so as to be converted into pixels in the scanning unit.
Given that the image is reconstructed point by point using this technique, it cannot be observed through the eyepiece because it does not exist as a real image.
* Confocal microscopy can be performed using the epi-fluorescence mode of brightfield reflection mode depending on the sample being visualized. For instance, whereas the reflection microscopy mode is suitable for imaging surface and multilayer structures, the fluorescence mode is ideal for thick specimens.
Fluorescence Microscopy Vs Confocal Microscopy
Apart from the differences in the working principles of the two techniques, differences can also be identified in their strengths and limitations. For instance, fluorescence microscopy is very sensitive which allows for the detection of single-molecules. Moreover, unique optical properties of molecules contribute to high specificity among these microscopes.
They also have a number of limitations including susceptibility to autofluorescence, biocompatibility issues and the fact that fluorophores tend to lose their ability to fluoresce following illumination. On the other hand, fluorescent reporter proteins and fluorescent molecules tend to cause phototoxic effects on live cells.
With regards to confocal microscopy, one of the biggest advantages is that it's possible to control the depth of field by serially producing thin optical sections of thick specimens. By obtaining optical slices from increasing depth of the sample, it becomes possible to produce a 3D image of the sample.
In fluorescence microscopy, on the other hand, images of samples that are over 5 micrometers in thickness appear blurry (indistinct) given that some parts of the sample tend to be outside the focal plane. Therefore, when it comes to visualizing thicker specimen, confocal microscopy is the superior technique.
Some of the features that contribute to this advantage of confocal microscopy include:
- Specific wavelengths are used to excite the specimen and produce fluorescence
- By eliminating lateral interference, the technique is able to improve image contrast
- Light is collected from a single focal plane
Some of the main disadvantages of confocal microscopy include:
- High-intensity laser irradiation used in confocal microscopy is harmful to live cells (however, some of the newer models in the market have been able to address this issue)
- The signal to noise ratio in confocal microscopy tends to increase sensitivity to noise
- The detector pinhole tends to reduce signal strength
- The technique is time-consuming and requires good training
Also see Immunofluorescence Microscopy
Return to Photoactivated Localization Microscopy
Return from WideField Epifluorescence Microscopy to MicroscopeMaster home
References
Chris Stewart and John Giannini. (2016). Inexpensive, Open Source Epifluorescence Microscopes. Journal of Chemical Education.
Colin J. R. Sheppard. (2003). Scanning Confocal Microscopy. ResearchGate.
Donna J. Webb and Claire M. Brown. (2014). Epi-Fluorescence Microscopy. ncbi.
Doug Richardson. (2017). Which Fluorescence Microscopy Techniques is Best for Me?
Ellen C. Jensen. (2012). Types of Imaging, Part 2: An Overview of
Fluorescence Microscopy. Wiley Periodicals, Inc.
Links
https://www.ptglab.com/news/blog/if-imaging-widefield-versus-confocal-microscopy/
https://www.sheffield.ac.uk/kroto/confocal/confocal_imaging
https://www.olympus-lifescience.com/en/microscope-resource/primer/lightandcolor/fluorointroduction/
Find out how to advertise on MicroscopeMaster!
