Cell Staining Protocol for Microscopy
Procedures, Types & Techniques
Microscopy refers to the practice that involves the use of a microscope for the purposes of observing small scale structures that cannot be viewed using the naked eye and often cell staining is necessary as structures are difficult to discern due to insufficient contrast.
Cell staining is a technique used for the main purpose of increasing contrast through changing the color of some of the parts of the structure being observed thus allowing for a clearer view. There are a variety of stains that can be used in microscopy.
First of all, staining can be in-vivo or in-vitro. The difference between these is that whereas In-vivo staining refers to the staining of a biological matter while it is still alive, in-vitro staining refers to a staining technique where the biological matter is non-living.
The following are common stains explaining techniques, preparations and procedures for each:
Haematoxylin and Eosin Staining
Technique
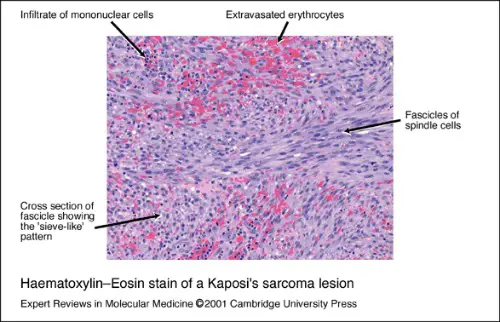
These are two stains used in the examination of thin slices of biological tissue. Contrast is created by the stains where Haematoxylin turns the nuclei blue while eosin turns the cytoplasm as well as other parts pink or red.
Preparation
Haematoxylin
1- Measure 10 grams of haematoxylin crystals 500 ml of water (70- 80 degrees centigrade) and mix to dilute completely
2- In a separate flask, measure 20 grams of alum and mix with 500 ml of hot tap water (70- 80 degrees)
3- Mix the two mixtures together (1 and 2)
4- Add 1 gram of crystal.
Whereas alum is the mordant, thymol prevents fungal growth.
5- The mixture is then kept in a translucent flask away from direct sunlight for one week. This is covered with a paper towel that allows for air circulation (early maturation). The solution is then put in to a dark flask and topped tightly after one week, and stored in a dark place for 3 weeks. (Late maturation)
Eosin (1000ml)
1- Measure 10 grams of eosin crystals and add to mix in 1000ml of hot tap water (70- 80 degrees). This should be mixed to dilute and stored in a dark flask. This can be used directly.
Procedure
1- A rehydrated section is stained in a solution of haematoxylin for 20 to 40 minutes
2- The section is then washed in tap water for about 3 minutes until it turns blue,
3- The section is the differentiated in 70percent ethanol that contains 1 percent of HCL for about 5 seconds to remove excess dye and allow the nuclear to emerge,
This is then washed in tap water,
5- Stain with eosin for 10 minutes,
6- Then wash for about 1 to 5 minutes in tap water,
7- Dehydration, clear and mount on a rack
Haematoxylin-Eosin Stain Kaposi's Sarcoma lesion - Cambridge University Press; http://www.cambridge.org
Papanicolaou Staining
Technique
This is also referred to as pap-staining or pap smear. It is used for the purposes of examining cell samples that have been obtained from body fluids.
The technique involves the combination of chemicals that include:
o Light green SF yellowish,
o Haematoxylin,
o Orange G,
o Eosin Y,
Preparation
ACCUMATE differentiating solution is made ready for use. A substitute of Scott's Tap water is prepared through mixing a part of Scott's Tap water substitute concentrate with 9 parts of deionized water. This is then followed by filtering papanicolaou staining system reagents before use.
Procedure
1- Fix the slides in acetic fixative for 15 minutes,
2- Absolute alcohol for two minutes,
3- 70 percent of alcohol for 2 minutes,
4- in 50 percent for 2 minutes
5- Tap water for 2 minutes,
6- deep in haematoxylin for 4 minutes,
7- Briefly rinse in tap water,
8- Differentiate in acid alcohol for about 5 seconds,
9- Blue inside tap water,
10- Dehydrate using absolute alcohol two times,
11- Stain in orange G for ten seconds,
12- Rinse in absolute alcohol two times
13- Stain in E.A 50 for two minutes,
14- Stain in absolute alcohol two time,
15- Clear in xylene three times,
16- Mount the slide on xylene three times,
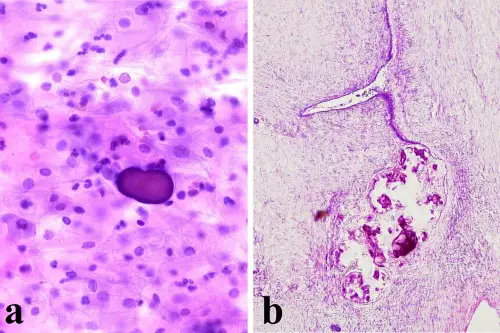
a) Presence of a psammoma body in absence of atypical cells in cervicovaginal smear (Papanicolaou stain, 200×); b) Serous ovarian cystoadenofibroma with parietal psammoma bodies (Hematoxylin and Eosin, 100×).
Pusiol et al. CytoJournal 2008 5:7
Acid and Basic Fuchsin Stain
Technique
Acid fuchsin is a magenta red acid dye that is largely used for plasma staining whereas basic fuchsin is a magenta basic dye largely used to stain the nucleus.
The technique is also referred to as acid fast staining. The acid fast bacteria have a waxy substance (mycolic acid) on their cell wall that makes them impermeable to staining procedures.
The term acid fast is used since they resist decolourization with acid alcohol. Carbol fuchsin, the primary stain contains phenol, which helps solubilize the cell wall whereas heat is used to increase the penetration of the stain.
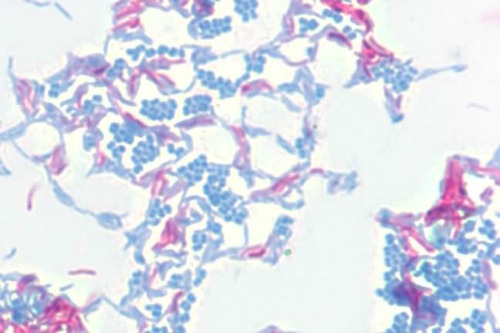
On using alcohol to decolorize, cells will be decolorized except for acid fast ones. Methylene blue is used as the counterstain to any cell that was decolorized. At the end of the procedure, acid fast cells remain red/pink while non-acid fast cells retain a blue color.
Preparation
Preparation of carbol fuchsin by mixing two solutions:
Solution 1- 0.2 grams of basic fuchsin and 10 ml of 95 percent ethanol,
Solution 2- 5 grams phenol and 90 ml of distilled water,
Procedure
1- Swab pulp larvae together so as to allow the pulp to spread over the slide and allow to dry
2- Heat fix by flaming over a burner several times,
3- Flood using 0.2 percent of carbol fuchsin for about 30 seconds,
4- Wash off the stain and then air dry/gently blot dry before examination
A photomicrograph of Mycobacterium smegmatis (pink) and Micrococcus luteus (blue) 1000x magnification. Mycobacterium smegmatis is acid-fast, retaining the carbol fuchsin dye, thus appearing pink. Micrococcus luteus is not acid-fast, loses the carbol fuchsin during decolorization, and is counter-stained with methylene blue.
Image from: http://inst.bact.wisc.edu
Wright's Stain
Technique
This is a Romanowsky type of metachromatic stain that is prepared by mixing specially treated methylene blue dye with eosin.
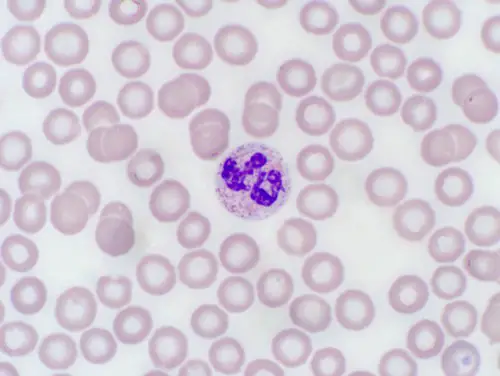
The acidic portion of the stain unites with the basic components of the cells such as hemoglobin, and thus they are referred to as eosinophilic and are stained pink or red.
The acidic components of the cell, such as the nucleic acids on the other hand take the basic dye and stain blue or purple.
PH has to be controlled using a buffer of 6.4 to 6.7 to avoid poor staining.
Preparation
o Measure 1.0 grams of wright's stain powder and 400 ml of methanol (methyl alcohol),
o Add a few glass beads to assist in dissolving and add the ethanol to the stain,
o Mix well at intervals until the powder has completely dissolved (do this by warming in 37 C water bath to aid in the dissolving),
o Label the bottles and mark it as flammable and toxic,
o Tightly atop and store at room temperature in the dark
Procedure
1- Prepare a fill of the sample and allow drying on a slide,
2- Prepare three containers, and fill one with one step Wright’s Stain and the other two with distilled water,
3- Keep the stain tightly covered when not in use to avoid evaporation (always replace the stain once it becomes insufficient)
4- Always replace distilled water once iridescent scum start forming on the surface, or when it starts turning blue,
5- Dip the slide in the stain for 15 to 20 seconds,
6- Dip the slide in distilled water in the second container for 15- 45 seconds,
7- Dip the slide in container 3 for 25 seconds using quick dips,
8- Wipe the back of the slide,
9- Dry the slide on a vertical position, on the absorbent surface and avoid blotting the smear,
10- Apply oil to examine microscopically,
These steps should be repeated two times for marrow smears.
The Rack Procedure
1- Prepare the sample and allow to air dry,
2- Place the slide on a rack,
3- Apply the one step wright's stain using dropper bottles,
4- Wait for about 15-30 seconds and add similar volumes of distilled water,
5- Pour stain and water mixture off the slide,
6- Dip the slide in distilled water for about 25 seconds using quick dips,
7- Wipe the back side of the slide,
8- Dry the slide in a vertical position on the absorbent side and avoid blotting the smear,
9- Apply oil and observe
These steps should be repeated twice for bone marrow samples.
Wright's Stain, 1000x
Image from: http://www.vetmed.vt.edu
Gram Staining
This is one of the most common staining techniques.
It is largely used to differentiate bacteria species as either gram positive or gram negative. This is achieved through the chemical properties of bacterial cell walls, where different colors are displayed after staining.
This technique is based on the fact that the gram positive cell wall has a strong attraction for crystal violet following the addition of iodine as compared to the cell wall of gram negative.
Iodine is the mordant, and forms a complex with crystal violet, which is easily washed off from the gram negative cell wall using ethyl alcohol.
Cell staining in Microscopy is useful and necessary to highlight those structual elements of your sample/specimen to be properly observed. There are others that MicroscopeMaster may cover in the future so bookmark this page and revisit to see further staining information.
Related Article:
Endospore Stain - Definitions, Techniques and Procedures
Capsule Stain -Definitions, Methods and Procedures
MicroscopeMaster Picks for Cell Staining here.
Learn more about Cell Culture, Cell Division, Cell Differentiation as well as Tissue Culture Types and Techniques. And take a look at the reasons to consider purchasing a Microscope Staining Kit.
Take a look at specific Organelles.
See differences between cytosol and cytoplasm here.
You can learn about Prepared Microscope Slides too.
And Microscopy Culture and Sensitivity tests.
Check out Beginner Microscope Experiments for ideas.
Return to Cell Biology Main Page
Return from Cell Staining in Microscopy to Microscope Slides Preparation
Return to MicroscopeMaster Home
References
Mallory F.B.; A.M,; M.D.; S.D. Pathological Technique. Philadelphia & London. W.B. Sunders Company. Copyright, 1938, by W.B. Sunders Company. Reprinted June, 1942 and September, 1944. Pgs. 70 and 9
Johnson PL, Klein MN: Application of Papanicolaou stain to paraffin sections. Stain Technol 31:223, 1956
Delisle, G., and L. Tomalty. 2002. Mycobacterium tuberculosis. MicrobeLibrary, American Society for Microbiology, Washington, DC.
Find out how to advertise on MicroscopeMaster!
