Ants under a Microscope
Classification, Microscopy and Observation
General Introduction to Ants
Ants are some of the most common insects found in various terrestrial ecosystems across the world (except the Antarctica). According to recent updates, there are over 12,000 known species of ants.
They evolved from wasp-like organisms about 120 million years ago (during the mid-Cretaceous period) and play an important role in various ecologies as scavengers, herbivores, predators, and granivores. In the Amazon, for instance, ants have been suggested to make up about 30 percent of the total animal biomass.
Like human beings, ants are social organisms that live in highly organized societies as colonies (formicary). As such, they have been shown to exhibit complex social behavior through their interactions. Typically, a colony of ants consists of one or several egg-laying queens (depending on the species) and an army of female worker ants. Males, on the other hand (which have wings), usually die shortly after mating.
* Ants have been associated with such behaviors as herding (through their relationship with aphids) and storing food in an organized manner.
General Classification
- Kingdom: Animalia
- Phylum: Arthropoda - Characterized by animals with an exoskeleton, jointed appendages and a segmented body
- Class: Insecta - Encompass all insects
- Order: Hymenoptera - A large group consisting of various insects including wasps, ants, bees, and sawflies among others
- Family: Formicidae - Ants
Some of the most common species of ants include:
- Black carpenter ant
- Bullet ant
- Formica rufa - Redwood ants
- Formica sanguinea - blood-red ants
- Formica polyctena
Study of Ants
Myrmecology is the branch of entomology that specifically deals with ants. While human beings have known about ants throughout human history, Anguste Forel, a Swiss psychologist, is credited for his role in paving the way for scientific study of these insects.
As a child, Forel began collecting and even classifying different types of ants. This experience allowed him to develop a good understanding of these insects with his book "The Ants of Switzerland" winning the prestigious Thore Prize at the Paris Academy of Science in 1857 when he was just 27 years old.
Through his experience with ants and knowledge of anatomy, Forel also went on to propose a new taxonomy of these insects based on their morphology.
* Forel also made significant contributions in the field through his works on the psychology of insects.
Modern myrmecology, however, was founded by William Morton Wheeler, an American entomologist, and myrmecologist. In the late 1890s, Wheeler was introduced to several ants he had not seen before which not only increased his curiosity about these insects but also led him to spend the rest of his life studying them.
His studies allowed him to learn of their behaviors and anatomies among other characteristics. Wheeler also went on to name many of the species of ants and in doing so, become globally recognized as an authority in the field.
Objectives
These experiments are aimed at studying the general morphology of several types of ants as well as their eggs, larvae, and pupae.
By the end of these activities, you should be able to:
- Know how to prepare a specimen for observation
- Learn how to use a microscope to study different parts of an ant
- Describe the morphology of ant eggs, larvae and pupae
Magnifying glass
Before observing the ants, eggs, larvae, and the pupae under the microscope, you can start by making observations using a magnifying glass to get a general idea of their general morphology.
Requirements
- Magnifying glass/lens
- Ants
- Eggs
- Pupae
- Larvae
- Plastic tweezers
- Leather gloves (optional)
Procedure
* Ants can be found just about anywhere in terrestrial habitats. Therefore, it should be easy to fine several types of ants just by looking around (e.g. underneath rocks, in soil, inside old wood, etc)
* You can also order a kit consisting of dead or live ants. This will also come with the eggs, larvae, queen ant, and workers
* Ant eggs can be found in wetland areas
· Put on your pair of leather gloves given that live ants can pinch your skin
· Using your tweezers, gently pick up the ant (dead or alive) and carefully observe the different parts of the insect (head, thorax, exoskeleton, abdomen, legs, antennae, the mandible etc)
· If you get an opportunity to observe the eggs, place them in a Petri dish or a microscope glass slide (with a black paper under the slide of Petri dish for contrast) and observe using the magnifying glass
· Using your tweezers, carefully pick up the larvae and pupae and make observations: compare their appearance to the eggs
· Record your observations
Observations
Ants
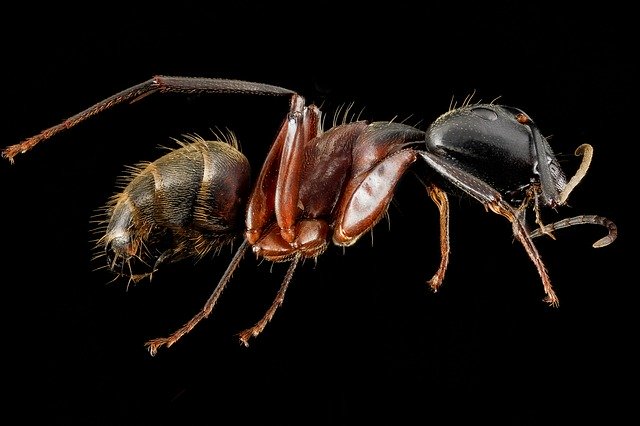
Although some ants may be larger than others, you will notice that they all have three main body parts: The head, thorax, and abdomen. The thorax is the middle segment of the body and it is the part of the body on which the six-segmented legs are attached.
If you take a closer look at the head, you will also notice a pair of antennae, two compound eyes on either side of the head as well as the mandibles (mouthparts) that are highly serrated. By looking at the entire body of the ant, you will also notice the leather-like exoskeleton. This is an important structure (made of chitin) that protects the inner organs and muscles.
* If you notice two pairs of wings (located in the thorax segment), then the specimen was a male ant
* When viewed under the magnifying glass, and compared to the female workers, the queen ant is noticeably larger in size and may possess larger wings compared to those of male ants. Other than that, they have similar body parts to the worker ants.
Eggs
Ant eggs are very small (no bigger than 1 mm in diameter). For this reason, the magnifying glass may not provide many details about its morphology. However, if you take a closer look, you may notice that they appear oval in shape.
Larvae and Pupae
Under the magnifying glass, the larvae will exhibit a worm-like shape. However, you will notice that it has no legs or eyes. Depending on the species, the pupae may be in a cocoon. However, for those that lack a cocoon, you will notice that the body resembles that of the adult. The only difference here is that the legs and antennae of these forms are folded against the body.
Preparing the Specimen
Unlike the previous method where you can observe a live ant using a magnifying glass, this technique requires that the specimen be prepared using chemicals for identification. A number of methods can be used to prepare the specimen.
These include:
Storage using Ethyl Alcohol
Requirements
- Specimen (ant)
- 70 to 75 percent ethyl ethanol
- Insect pins
- Pair of tweezers
- Triangular point
- Water-soluble glue
- Pair of scissors
Preparation
The ant to be observed under the microscope should be stored in 70 to 75 percent ethyl alcohol. This allows the specimen to last for a long time.
In order to study the fine details of the specimen, then the following steps should be taken to prepare the specimen:
· Triangular points can be ordered online or hand-cut using a pair of scissors. To make a triangular point, use a pair of scissors to cut off a small piece from a strip or acid-free paper- This should be of the appropriate length to hold the specimen
· Using a small amount of the glue, glue the specimen to the tip of the point (repeat this process with other ants on newly cut triangular points) - Here, the bottom part of the ant (the first segment of the thorax) should be glued to the point with the point extending from the right side of the ant (once the ant is glued, it should be upright and horizontal)
· Gently pull the legs downwards so that the entire body can be seen
· You can use the insect pins to hold up the points

* While this technique consumes more time, it ensures high stability and in addition to providing protection of various body parts (antennae, legs).
Depending on the part of the specimen you would like to observe closer, a number of other methods are used to prepare the specimen.
These include:
The standing position - The ant is in a standing position on its tarsae on a paper. Here, the fore-legs are oriented frontwards while the middle and hind-legs are directed backward. The mesosoma (middle part of the body), on the other hand, is uplifted so as to allow for a better view of the segments in this region (waist segments).
Wilson-preparation/Wilson method - For this method, the legs of the specimen are bent in a central position. The second and third coxae of the specimen are then glued to the point (the head of the specimen is made to point to the left). These angles makes it easy to view the specimen from all angles easily.
Basket-shape arrangement of the legs - For this method, the legs of the specimen are bent in a basket-like manner on the ventral side. The specimen is then glued on the tip of the triangle in such a manner that the metatarsae and tarsae are in contact with the tip. Moreover, the antennae are bend so that they face downwards. This allows the head and mesosoma parts of the ant to be elevated and thus observed with ease.
* To observe male genitalia, male ants can be prepared using the Wilson method. This makes it easy to observe the abdomen of the ant from different angles.
Dissection
If you wish to observe different parts or inner parts of an ant, then you can dissect the specimen by following the steps below:
Requirements
- Pair of gloves
- Dissecting knife
- Saline (0.65% physiological saline)
- Water
Procedure
· Put on a pair of gloves
· Using a dissecting knife (dissecting blade), gently separate/detach the different segments of the body so that you completely separate the head, thorax, and abdomen from each other
· To observe the inner parts of the intestine gently cut the abdomen lengthwise and open it up using a pair of tweezers
· If the specimen is dry, then you have to rehydrate and soften it. This involves immersing the specimen in diluted detergent (1 part detergent and about 8 parts water) for about 10 minutes. The specimen is then transferred to saline or sap water for about 20 minutes before being allowed to air dry and dissected
* Once the specimen has been dissected, 0.65 percent physiological saline can be added before it is observed under the microscope.
Microscopy
Requirements
- Specimen
- Stereo microscope
- Petri dish
Procedure
· Switch on the top lighting of the microscope so that light can reflect off the surface of the specimen
· Turn the revolving turret so that you set the lowest power objective in place
· For the glue specimen (on the triangular point), it can be viewed directly under the microscope at low power - Turning the pin slowly will allow you to get a clear image of different parts of the specimen. The specimen may be placed in a Petri dish first so as to focus before turning it gently to observe different parts of the ant
· For the dissected ant, place the segments in a Petri dish and place the Petri dish on the stage
· Look through the eyepiece and gently turn the focus knob to bring the image into focus
· Gently move the Petri dish to get a clear image of each segment - Repeat this step for the dissected abdomen segment to observe the inner parts of the insect
* These steps can be repeated to observe the eggs, larvae, and pupae
* You can switch to the higher objective and repeat the steps mentioned above. This will allow you to zoom in and record your observations.
Lastly, lower the stage before removing the Petri dish
Observations
As with the magnifying glass, this method will reveal the three distinct parts of the ant (head, thorax, and abdomen). However, due to the higher magnifying power of the microscope compared to a magnifying glass, it will be possible to view the following details:
In both the wings of the male and female (queen ant) ants, you will notice a network of irregular veins that serve to strengthen the wings. The anatomy of the thorax, on the other hand, will reveal three distinct segments (T1, T2, and T3).
While each segment has a pair of legs, only the second and third segments support a pair of wings each (the second pair of wings located on segment T3 is smaller compared to the first pair).
Using higher magnification power, it might also be possible to identify the petiolus located between the thorax and abdomen. This is an important structure that allows the ant to be flexible (allowing the abdomen to bend under the body and spray poison from the abdominal glands). The antenna, which can bend in the middle (like the knee) may appear segmented towards the end.
Like flies, ants also have compound eyes that vary in size depending on the species. For each eye, a closer look will reveal numerous units known as ommatidia. In addition to the two compound eyes, the microscope may also reveal three smaller eyes arranged to form a triangle. These are common in the queen and male ants.
Under the microscope, it will be possible to get a better view of several mouthparts of the ant. These include two large upper mandibles, the upper lip (labrum), lower mandibles known as maxilla as well as the lower lip (labium) from which the labial palp originate.
* An array of fine hairs will also be visible on the head, ventral side, as well as upper parts of the legs.
* Ant eggs - Will appear white in color with an oval shape.
 and Myrmicinae (below) by ASU Ask A Biologist, http://askabiologist.asu.ed /CC BY-SA(https://creativecommons.org/licenses/by-sa/3.0)")
%20and%20Myrmicinae%20(below)%20by%20ASU%20Ask%20A%20Biologist%2C%20http%3A%2F%2Faskabiologist.asu.ed%20%2FCC%20BY-SA(https%3A%2F%2Fcreativecommons.org%2Flicenses%2Fby-sa%2F3.0))
Larvae
Some of the details of larvae that can be identified under the microscope include:
- Small hairs - Allows them to remain attached to each other and on various surfaces
- Have no limbs
- Might be held near the eggs
- Mouthparts are well developed allowing them to eat
Pupae
In some species, the pupae stage is characterized by a cocoon.
For those that don't form a cocoon, the body will appear to be in the fetal position (with legs crossed at the lower part of the thorax).
Conclusion
By observing different types of ants under a microscope, it might be possible to identify many other anatomical parts. You can, therefore, record and identify how different types of ants compare (size, the shape of different structures, etc). In addition, you can also try to determine how ants resemble termites to determine whether they share any similarities.
Return to learning about Arthropods
Return from "What looks cool under a Microscope?"
Return from Beginner Microscope Experiments
Return from Ants under a Microscope to MicroscopeMaster home
References
Alexander Prosche. (2018). Conservation of ant material for natural history collections
(Hymenoptera: Formicidae).
Brian Fisher and Stefan P Cover. (2007). Ants of North America: A Guide to the Genera.
Daniel L. Schacter. (2004).Forgotten Ideas, Neglected Pioneers: Richard Semon and the Story of Memory.
Diethard Tautz. (2014). Evolutionary Morphology: One size does not fit all.
Links
https://www.antkeepers.com/facts/ants/anatomy/
https://www.nationalgeographic.com/animals/invertebrates/group/ants/
Find out how to advertise on MicroscopeMaster!


MicroscopeMaster.com is a participant in the Amazon Services LLC Associates Program, an affiliate advertising program designed to provide a means to earn fees by linking to Amazon.com and affiliated sites.
Recent Articles
-
Deltaproteobacteria - Examples and Characteristics
Nov 01, 22 04:44 PM
 Deltaproteobacteria is a large group (Class) of Gram-negative bacteria within the Phylum Proteobacteria. It consists of ecologically and metabolically diverse members. Read more here.
 -
Chemoorganotrophs - Definition, and Examples
Oct 26, 22 05:01 PM
 Chemoorganotrophs also known as organotrophs, include organisms that obtain their energy from organic chemicals like glucose. This process is known as chemoorganotrophy. Read more here.
 -
Betaproteobacteria – Examples, Characteristics and Function
Oct 25, 22 03:44 PM
 Betaproteobacteria is a heterogeneous group in the phylum Proteobacteria whose members can be found in a range of habitats from wastewater and hot springs to the Antarctic. Read more here.