Microscope Stage Micrometer and Measurements
What is a Stage Micrometer?
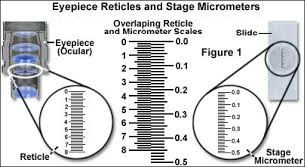
A stage micrometer is the term typically referring to a slide (1" x 3" microscope) that comes with a scale on its surface. The sides are mounted with a reticle scale that is used for calibrating the reticles of the eyepiece as well as the objective powers. Although most stage micrometers are made of glass, they are also composed of metal especially for dissecting microscopes.
While microscopes serve the primary function of enlarging objects being viewed, they are also used to make measurements of the objects/specimen. Given that this is not possible with the ordinary ruler, the eyepiece reticle (eyepiece scale) is used to make such measurements.
Stage micrometers are particularly useful given that the objectives and eyepiece reticles of a microscope are often interchanged. For this reason, there is a need to carry out a routine calibration to ensure accuracy when measuring objects/specimen.
*A micrometer may be used by being directly mounted on the object being viewed. However, this is expensive and impractical and thus not common.
Eyepiece Graticule/Reticule Calibration
The eyepiece graticule is an important part of the eyepiece that allows for measurements. It's a disc made of glass marked with a scale from 0 to 100 (um). Depending on the type of eyepiece, the eyepiece graticule may be fitted onto the eyepiece or be purchased separately and attached onto the eyepiece for measurements.
During calibration, it's important that each individual lens be calibrated separately starting with the lowest power objective. This makes it possible to have distinct calibration power for each.
During the calibration process, the stage micrometer has to be aligned with the eyepiece graticule scale followed by taking the readings. Readings obtained from the scales are then used for the purposes of calculating the calibration factor. The process involves aligning the zero point/lines on both scales first.
Once the two points have been aligned properly, then the one calibrating has to scan through the scale lines to find a point where the lines of both scales align. It's important to ensure that the starting point (zero point/line) of the two scales align properly before scanning to find the next lines. This ensures that the right readings are obtained and recorded for calculating the calibration factor.
To calculate the relationship between the two points that have aligned, the following formula is used:
Number of units = number of divisions on stage micrometer divided by the number of divisions on the eyepiece.
Example:
Assuming that in a given alignment there are 30 divisions on the stage micrometer that has aligned with 10 on the eyepiece scale, calculating this would give us 3 units. In the event that the calculation gives a number with decimals (e.g. 3.6363) then the number may be rounded off. For instance, 3.6363 can be rounded off to 4 or 3.6. Here, the number obtained from the calculation is the calibration factor and gives the number of units in each division of the eyepiece.
Here, it's worth noting that the conversion factor of each objective is different. For this reason, it's important to calibrate each objective lens individually so as to obtain their respective conversion factor. This becomes important particularly when making measurements when viewing the specimen using different magnifications.
When making measurements, it's particularly important that the right units of measurements are used. Here, 1 mm is equal to 1000 micrometers (um). The figures obtained from the calculations should be converted to micrometers during measurements.
Source: http://www.brunelmicroscopes.co.uk/micrometers.html
Measuring Using a Microscope
When measuring the size of the object/specimen, it's always important to measure the diameter. Here, the student may measure the longest and shortest diameter of the specimen in the field of view. When in the field of view, the student should calculate the eyepiece divisions, which represents the diameter of the specimen.
For instance, the diameter of the specimen here may be 12 divisions. This number does not really represent any specific units.
In order to determine the length of the specimen, these units should be multiplied to the conversion factor in order to get the measurements in micrometers. This makes it possible to tell the actually length/width of the specimen/object being observed.
Return to Microscope Accessories
Return from microscope stage micrometer to MicroscopeMaster Home
Find out how to advertise on MicroscopeMaster!


