Worm under a Microscope
A fun experiment is observing a worm under a microscope. Worms have been around for hundreds of millions of years. In that time, they have evolved (as others became distinct) into the worms we see today.
According to an article that was published in the National Geographic in 2018, for instance, a fossil (about 500 million years old) of a bristle worm discovered in British Columbia revealed that the organism contained numerous tiny hairs (for swimming) as well as a pair of tube-like palps on its head (sensory organs). Although the organism no longer exists today, leeches and earthworms are its descendants.
Charles Darwin, considered to be the father of evolutionary thought, was particularly fascinated by earthworms and dedicated time to study their life and behavior. Through his studies, he was able to determine how they behave, the type of food they prefer as well as their anatomy among many other characteristics.
By meandering in the earth (in soil) and through their feeding habits, Darwin was also able to explain their benefits in agriculture.
* Interesting note: In the early years of microscopy, sperm cells were considered parasitic worms (referred to as spermatic worms) by some scientists and philosophers.
General Introduction to Worms
Essentially, worms are invertebrate animals that are divided into three major groups: flatworms, roundworms, and segmented worms. Although they vary in shape and size, worms are characterized by an elongated/slender, soft body that is bilaterally symmetrical.
They are also legless and therefore move by creeping on surfaces using a set of muscles. However, some species possess hair-like structures involved in movement.
Worms can be found in a variety of habitats across the world. For instance, while such worms as earthworms can be found in many moist terrestrial environments (in the soil or decomposing organic material), Polychaetes are abundant in marine habitats.
Tube worms (Riftia pachyptila), on the other hand, can be found on the sea floor where they form a symbiotic relationship with sulfur bacteria. Other worms exist as parasites and can be found living in plants and animals.
Some of the other characteristics associated with worms include:
- Have a body cavity known as a coelom
- Majority of species have a digestive system
- Have a nervous system
- Bodies are formed from the primary germ layers
A few examples of worms include:
- Earthworms
- Leeches
- Polychaete worms
- Pseudobiceros filgor
- Yellow papillae flatworm
- Hookworms
Objectives
The main objective of observing a worm under a microscope is to compare a member of each group of worms (flatworms, roundworms, and segmented worms). This will allow students to determine some of the similarities and differences between these worms.
By the end of these activities, students should be able to:
- Know how to use a microscope to observe specimens
- Understand how to prepare specimens for microscopy
- Compare and contrast the morphology of the three groups of worms
Before viewing the worm under a microscope, using a magnifying glass is always recommended to get a general idea of what the specimen looks like.
While a magnification has lower magnification power compared to a microscope, it will allow you to magnify the image several times to get an idea of the general morphology.
Requirements/Materials:
· Magnifying glass - A typical magnifying glass has a magnifying power of between 1× and 2×
· Petri dish
· Pair of tweezers
· Specimen: Earthworm (segmented worm), a Planarian flatworm, and Eelworms (roundworms)
· Pair of gloves (Nitrile rubber)
· Container
· Sieve
· Mini Garden Shovel
* The three types of worms have been selected because they can be easily found (Earthworms; found in gardens and loose soil, Planarian flatworms can be found in shallow water, ponds, and rivers while Eelworms can be found infecting various crops e.g. tomatoes) and are safe to handle. Moreover, they represent each group and will make the comparison process easy.
Procedure: collecting specimen
· In order to collect the specimen, you may use a pair of gloves. However, this is optional given that these worms are harmless for the most part.
· Using a mini garden shovel, gently dig around your garden or loose moist soils to find one or several earthworms.
· Using a pair of tweezers, gently pick up the earthworms and place them in a Petri dish (you may have to partially cover the Petri dish to prevent them from escaping).
· To collect the flatworms (Planarian flatworms) use a container to draw water from a shallow pond or river. Here, you will have to take a closer look (you can use the magnifying glass) at the water in the container to see whether you were able to get the worm. This is because they are small in size, ranging from 3 to 15mm in length. Depending on the species, they may be black, gray or brown in color.
· Once you are sure you have collected the flatworms in your container, you can sieve the water to easily collect the worm and keep them in a Petri dish (make sure each type of worm is kept in a different Petri dish) - You can add a little water in the Petri dish to preserve the worms.
· As compared to the other two, collecting eelworms may prove challenging given that they are barely visible (0.4-1.2 mm) to the naked eye. However, the worms can be collected by identifying an infected crop (tomatoes or rhubarb, potatoes, etc).
To collect eelworms, the following steps can be used:
· Gently break the infected part of the crop (e.g. leaves) into tiny bits
· Place the leaves in a glass container of water for about 30 minutes
· After 30 minutes, you will observe eelworms (in a cluster) moving at the bottom of the container
· Gently pour off the water taking care not to lose the mass of eelworms
· You can retain the eelworms in the container or gently pour then in a Petri dish with a small amount of water
· Once you have collected the entire specimen in each Petri dish, carefully observe using the magnifying glass - This can be done while the worms are in the Petri dish
Observation
Earthworm
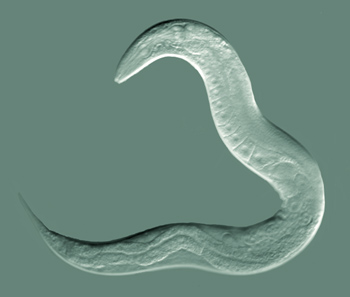
Under a magnifying glass, segments along the entire length of the worm's body will be clearly evident. These segments allow the organism to twist and move about. If you are observing the worm under good lighting, you may also be able to vaguely identify some internal organs of the worm (e.g. vessels). However, some species may have a darker epidermis making it difficult to see anything.
At the anterior part of the body, you will notice a narrow and pointed dead (smaller compared to the other body segments). Near the middle part of the body, you will also notice a distinct segment that appears swollen and lighter in color compared to the other segments. This is known as the clitellum and is involved in reproduction.
Some of the other parts that can be detected using the magnifying glass include:
- Setae - Hair-like structures on each segment
- Cylindrical body
Planarian Flatworms
Although they have an elongated body, these flatworms are much smaller (3 to 15mm) compared to the earthworms with a flattened body (leaf-like). As compared to the anterior part (which may be broad) the posterior end (tail) is more pointed. A closer look may also reveal eyespots at the head region as well as a pharynx located near the middle (central part of the body)
Eelworms
As compared to earthworms and Planarians, eelworms are significantly small in size. For this reason, it would be difficult to differentiate different body parts under the magnifying glass. However, they can be seen moving around in a group.
Earthworm under a Microscope
Using a microscope, you will be able to observe both the external and internal (through dissection) anatomy of the earthworm.

Requirements/Materials
- Earthworm specimen
- Alcohol solution
- Microscope
- Glass slide
- Water
- A pair of tweezers
Preparation Procedure
· Put a solution of alcohol (1 part alcohol and 9 parts water) in a Petri dish
· Using a pair of tweezers, pick one of the earthworms and place it in the alcohol solution - This step is aimed at killing the earthworm in preparation for microscopy
· Pick the earthworm and place it in water (Petri dish with water) - This step is aimed at washing off any dirt or mucus on the epidermis
Stereo Microscopy
To observe the external anatomy of the worm, a stereomicroscope can be used:
Procedure
· Place the worm in a Petri dish
· Turn the revolving turret to set the lowest magnification objective in place
· Carefully place the Petri dish on the stage
· While looking through the eyepiece, gently turn the focus knob to bring the image into focus
· You can adjust the light intensity by adjusting the condenser
· Once the image is in focus, try to find the anterior end of the worm and then move the stage to investigate the anatomy of the rest of the body
· Adjust to high magnification and repeat the process to get a closer look at the worm and record your observations
* The steps above can be repeated with a live earthworm to observe the movement of the worm (how the body and mouthparts move).
Observation
Under higher magnification power, a fleshy bump can be seen at the anterior part of the worm. This is known as the prostomium and is located around the mouth part of the worm. The anus is located at the posterior end. Under the microscope, a septum separating the tiny body segments of the worm can also be seen.
As compared to the dorsal part, you will also notice that the ventral surface (which is rounded and darker) of the worm is flatter. On the other hand, the setae (tiny hair-like bristles) and pores (pores on each body segment) will also be easily seen. Apart from the pores on the body segments, you should also get a clear image of larger pores (genital pores) near the anterior part of the worm.
Earthworm dissection
Dissecting the earthworm will make it easier to study its internal anatomy.
Requirements/Materials
- Dissecting pins
- Specimen
- Dissecting knife/blade or dissecting scissors
- Microscope
- Dissecting tray
- Pair of forceps
Procedure
- Place the specimen on the dissecting tray with its dorsal facing up
- Using the dissecting pins, secure each end in place - This will involve pinning both ends of specimen so that it remains in place during dissection
- Using the blade, carefully cut a small opening below the clitellum
- Using the forceps, lift the skin so that you can easily insert the dissecting scissors and cut the epidermis along a straight line towards the head and again towards the posterior end
- Using the forceps, pull apart the epidermis and carefully pin into the tray - This will require several pins to ensure that the internal anatomy of the worm can be clearly seen
* Observe the specimen under the microscope by following the steps above.
Observation
Under the microscope, it will be possible to identify several features of the internal anatomy.
These include:
· Aortic arches (Heart) - Five dark loops surrounding the esophagus serve as the heart of the worm
· Pharynx - is located at the anterior part of the worm inside the mouth. It consists of several muscles and will appear as a lightly colored organ
· Reproductive organs - are located near the heart, will appear as lightly colored tissue or tiny white organs
· Gizzard - is located behind the crop (serves to store food)
· Intestine - a long tube running from the gizzard towards the posterior part of the body
· Central nerve cord - is located on the dorsal part of the body, it can be easily seen by moving the intestine to the side (The nerve cord will look like a long white cord)
Planarian Flatworm under a Microscope
")
)
Preparing Temporary Slides
Requirements/Material
- Microscope glass slides
- Microscope coverslip
- Agar
- Compound microscope
- Vaseline
- Water
Procedure
* This technique is used to observe live worms
· Add a drop of hot agar (4 to 5 percent agar) on a clean glass slide - Agar used for this technique consists of Oxoid Agar Technical and cupric sulphate
· Using another clean slide, flatten the agar
· Once the agar has set, gently remove the slide (slide used to flatten the agar)
· Using a dropper, add a drop of water onto the agar
· Carefully introduce the flatworm on the drop of water and cover with a coverslip
* To prevent the flatworm from moving, a little vaseline may be added to the edge of the coverslip before gently pressing it down: taking care not to crush the specimen.
Microscopy
Once the slide has been prepared, observing the specimen under the microscope is the next step.
This will involve the following steps:
· Before mounting the slide, turn the turret in order to set the lowest power objective in place
· Carefully place the slide on the stage and keep it held in place with the clips
· Look through the eyepiece and turn the focus knob in order to bring the image into focus
· Using the stage adjustment knob, gently move the stage in order to view different parts of the specimen
· Switch to higher magnification and observe the specimen
· Lower the stage before removing the slide
Observation
Using a microscope, you will notice that the body of this worm appears flattened (resembling an elongated flat-leaf). The eyespots, located at the head part (anterior part of the worm) can also be observed. These pigmented cuts are sensitive to sunlight and thus function like eyes.
Depending on the species, the head may be pointed on the sides. These points are known as auricles and serve as the sensory structures involved in smell and touch. In the midsection, it might also be possible to spot the pharynx involved in feeding.
Roundworms (round worms) under the microscope
Eelworms are much smaller compared to the other worms discussed above. They can be grown using culture media before being inspected using a microscope.
Culture
Requirements/Materials
- Cider vinegar
- Vinegar eels
- Glass culture dish
- Pipette
- Apple
Procedure
· Using a pipette, add about 200ml of the vinegar into a clean glass culture dish
· Cut a few slices of apples and add them into the glass dish
· Introduce the eelworms into the container and cover it (cover the container loosely to slow down evaporation)
· Aerate the culture using a clean pipette (to force air into the culture media)
* By observing the Petri dish (with a dark paper under the Petri dish) under a stereoscope, it is possible to view the worms
Microscopy
Requirements/Material
- Specimen (eelworms)
- Compound microscope
- Dropper
- Microscope glass slide
Procedure
- Using a dropper, try collecting a few worms at the bottom of the Petri dish (in the liquid culture)
- Place about 2 drops of the liquid on several glass slides
- Mount the slide on the microscope stage (using the steps mentioned above) and observe with low magnification first before switching to higher magnification
Observation
If a worm is present, you will notice that it has a transparent epidermis. Compared to the body of the flatworm, the eelworm will be cylindrical (tube-like) with a pointed posterior. Higher magnification may reveal a mouth part at its anterior as well as an intestine running from the esophageal bulb towards the posterior part of the body.
Conclusion
There are many types of worms around us. Some are parasitic while many others exist as free-living organisms. You are therefore encouraged to collect different types of worms in your surrounding (or even order others online) and compare their anatomical characteristics to determine how they survive in their respective environments.
Also see more ideas: What looks cool under a microscope?, More fun microscope experiments
Return to learning about Flatworms
Return to learning more about Roundworms, also known as Nematodes
Return from Worm under a Microscope to MicroscopeMaster home
References
Flinnsci. (2016). Culturing Vinegar Eels Live Material Care Guide.
Gilbert A. Castro. (1994). Chapter 86Helminths: Structure, Classification, Growth, and Development.
William T. Crow. (2012). Earthworm: Entomology and Nematlogy.
Links
https://www.sciencelearn.org.nz/resources/22-charles-darwin-and-earthworms
https://learning-center.homesciencetools.com/article/earthworm-dissection/
Find out how to advertise on MicroscopeMaster!


MicroscopeMaster.com is a participant in the Amazon Services LLC Associates Program, an affiliate advertising program designed to provide a means to earn fees by linking to Amazon.com and affiliated sites.
Recent Articles
-
Deltaproteobacteria - Examples and Characteristics
Nov 01, 22 04:44 PM
 Deltaproteobacteria is a large group (Class) of Gram-negative bacteria within the Phylum Proteobacteria. It consists of ecologically and metabolically diverse members. Read more here.
 -
Chemoorganotrophs - Definition, and Examples
Oct 26, 22 05:01 PM
 Chemoorganotrophs also known as organotrophs, include organisms that obtain their energy from organic chemicals like glucose. This process is known as chemoorganotrophy. Read more here.
 -
Betaproteobacteria – Examples, Characteristics and Function
Oct 25, 22 03:44 PM
 Betaproteobacteria is a heterogeneous group in the phylum Proteobacteria whose members can be found in a range of habitats from wastewater and hot springs to the Antarctic. Read more here.