Sand under a Microscope
Overview
A fun experiment is to view sand under a microscope.
Sand is a granular material that consists of very small rock grains and granular minerals like ilmenite and magnetite among others. However, composition and the ration between the components of sand vary from one location to another. Like clay and gravel etc, sand is a sediment that can be found in different regions across the world.
Due to the different sand components (and the various proportions of these components), sand from one region may vary in color when compared to sand found in another region (black, pink, brown, etc). Sand inspection is important in a number of sectors including construction and agriculture. Moreover, it allows geologists to study the main components of sand and soil from different regions across the globe. For instance, by studying sand (arenology), a geologist or scientist can get a better understanding of different chemical and physical processes in a given region.
Significance of Arenology
The study of sand is known as arenology and a person who studies sand is referred to as an arenologist. While this field of study is commonly associated with geology, it's also an important field of study in chemistry and biology.
In chemistry, the study of sand allows chemists to understand the chemical profile of various minerals as well as various processes associated with the formation of sand grains. As a result, it becomes possible for chemists to understand the history of any given environment.
In biology, on the other hand, the study of sand allows biologists (e.g. marine biologists) to study various marine life remains that contribute to sand. This can help reveal the diversity and abundance of organisms in marine environments and similar ecology. Therefore, sand, like fossils, can help educate students about the past and the present.
* Apart from professionals who study sand in their respective fields of study, some people and students do it as a hobby. As such, they are commonly referred to as arenophiles.
Characteristics
For the most part, the sand is the term used to refer to finely divided or ground rock. As such, it's made up of fine particles/granules known as sand grains. In geology, the term sand is commonly applied to particles that have a diameter of between 1/16 (0.06) and 2mm.
In nature, rocks are broken into small fine particles (through a process known as weathering) by rain, running waters (e.g. in rivers), wind, and frost over time. These particles may then be carried to a different location by these agents (wind, river, etc).
* Although sand is commonly described as crushed/ground rocks, it's worth noting that some sand grains are partially made of various life remains (particularly marine life remains).
According to geologic studies, there are several main sources of sand.
These include:
- Skeletal remains of various organisms
- Granitic rocks
- Oceanic volcanic rocks
- Clastic and sedimentary rocks
Depending on where sand is formed or where it's transported once it's formed, it can be found as:
- Sandpits
- Dunes
- Beach sand
- Sand bars
Objectives in Microscopy: Sand under a Microscope
By the end of this activity, students should be able to:
- Identify different types of sand
- Use a microscope to observe and study the different characteristics of sand (size, color, etc)
- Understand the process of sand formation
Observing Sand with the Naked Eye and Magnifying Glass
Before observing sand grains using a microscope, you can use your naked eye and a magnifying glass to study the general characteristics (color etc) of different types of sand:
Requirements
Sand - (from beaches, desert, local sand, etc) - You can collect sand from your surroundings and compare it to sand from other regions. Also, you can order different types of sand from regions across the world on various internet sites.
- Several Petri dishes
- Magnifying glass
- White pieces of paper
- Spatula
- Gravel
- Silt
Procedure
(Optional) Place a white piece of paper under each Petri dish (clean) - Placing a while piece of paper under the Petri dishes will help create contrast and allow you to easily identify the color of each type of sand.
Using a spatula, scoop 1 gram of sand - In this step, pour a gram of each sand sample into different Petri dishes in order to observe then individually (e.g. pour a gram of beach sand in one Petri dish and a gram of desert sand in another and so on).
* Using the spatula, pour a gram of silt in one Petri dish and gravel in another - This will allow you to compare sand with silt and gravel.
* Wipe off any sand grains from the spatula each time you scoop different sand samples to avoid mixing different sand samples.
Comparing the different types of sand (as well as gravel and silt)
Feel Experiment
Before observing the different types of sand with a magnifying glass, rub a small amount of each sample between your fingers and record how each sample feels:
By rubbing these samples between your fingers, you will notice some differences in texture. While all the sand samples will feel grainy/coarse or gritty, you will notice that silt is smoother and feels more like flour. Gravel, on the other hand, consists of larger rock fragments compared to sand grains. The surface of a single fragment might be smooth or rough depending on where it was obtained.
* You can compare sand and other types of soil (dust, clay, etc) to determine how different they feel when rubbed between the fingers.
Color test (observe with the naked eye and magnifying glass)
For this test, study the samples of sand (in the Petri dishes) with the naked eye followed by using a magnifying glass.
Due to the differences in the components that make different types of sand, you will notice differences in color between the samples. The color test is important given that it can give you an idea of the main composition of the sample and where it may have originated.
Depending on the samples you obtained, different samples may exhibit the following colors:
White - White or whitish sand samples indicate such contents as eroded limestone, shell fragments, and coral. This sample of sand may also contain such minerals as magnetite and calcium-carbonate among others. Sand that is white in color is likely to be found in various beaches (e.g. the beaches of Hawaii and other tropical beaches).
Black - Volcanic sands tend to be black in color and may also be shiny. Black sand is therefore composed of volcanic minerals, fragments of lava as well as coral deposits in some cases. This type of sand can be found in Kalapana fire shore (Hawaii) and Yellowstone River (Wyoming).
Pink - Pink sand gets its coloration/hue from the remains (shells, calcium carbonate, etc) of tiny marine organisms known as foraminifera. Their shells, which consist of calcium carbonate are pink in color and when they die, they contribute to the formation of sand found on various beaches such as the beaches of Isla Harbor in the Bahamas. These sands are also common in Bermuda.
Red and red-orange - Apart from black sand, red and red-orange sand is also likely to be found in areas that have experienced volcanic events. In some cases, depending on the region, iron-oxide may contribute to the red or red-orange color of sand. Red sand can be found in Kaihalulu Bay in Maui, an area rich in iron.
Purple - Purple sand indicates the presence of garnet in the sample. This is a silica mineral that is common in continental rocks that have been exposed to high temperatures and heat. Although quartz is the main component of purple sand, it's garnet that gives it its color. Pfeiffer Beach in California is an example of beaches that contain purple sand.
Gray - Like white sand, gray sand also consists of high amounts of granite. However, these sands may also contain such minerals as feldspar, mica, or magnetite among others. Coral sands may also have a gray color due to broken and ground shells.
Based on color and where it's formed, sand may be classified into the following categories:
· Granite sands - These sands may be white or grey in color and are made from granite rocks. However, they may also contain a number of other components including mica and feldspar.
· Volcanic sands - Volcanic sands may be red, green, or black in color.
· Purple sands - This type of sand is formed from old continental rocks by tectonic forces. However, it also contains garnets. Therefore, purple sand is likely to be found in regions with garnet.
Some of the other types of sand that have been identified include:
- Coral sand - Made of coral material
- Gypsum sand - Sand consisting of calcium sulfate dihydrate
- Ooid sand - Made up of ooids pelletes
Microscopy: Sand under a Microscope
By observing sand with the naked eye, you will be able to identify differences in color between different samples. Using a magnifying glass will make it possible to get a closer look and observe individual grains of sand.
Under a magnifying glass, you may identify numerous grains of different colors, ranging from white to brown etc. However, using a microscope will provide better images through which you can identify differences in shape, size, and surface texture of individual grains of sand.
Requirements/Materials
- Sand samples
- Stereo microscope (e.g. Olympus SZX10 stereo microscope)
- Pasteboard (cover stock/card stock) or manila paper
- Small spatula
- Paper glue stick or transparent tape
- Single-hole punch
- A pair of scissors
Procedure
· Cut several 1 by 3 inches pieces of the paper - These will be used in place of glass slides in this experiment (You can cut as many pieces as you need to observe all your samples).
· Using the single-hole punch, create a hole at the center of your paper slides and then fix the transparent tape so that one side of the hole has a sticky surface (otherwise, apply paper glue on the paper to hold sand in place rather than making the holes on the paper).
· Using the spatula, apply a very small amount of the sand sample over the adhesive tape so that it remains adhered to the tape in the hole (you can repeat this step for as many sand samples as you would like).
Mount the paper slide under the microscope and observe under 25X magnification.
Observation
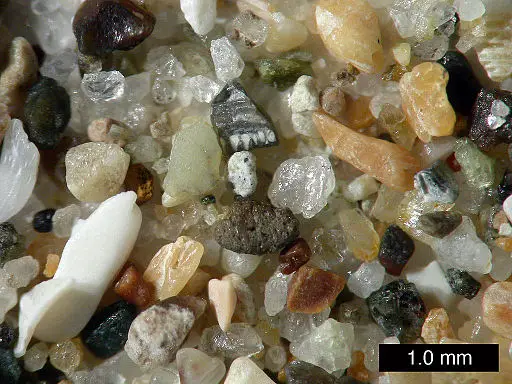
When viewed under the stereo microscope, samples will reveal a number of details. You will notice the diversity in size and shape between the granules, differences in color as well as texture. These differences are important in that they can give you a clue about where the sample was obtained and even how old the sample might be.
If the majority of sand grains of your sample is about the same size, then the sand is said to be well-sorted and may have accumulated at a given area over a long period of time. However, if the grains show a wide variety in size, then they are poorly sorted and may have been carried to a given area/location by such factors as strong river currents or a landslide etc.
Apart from differences in size, you may also notice differences in shape (of the sand grains) between your samples. Some of the grains may appear smooth and rounded which is evidence that they are older (referred to as mature sand grains). This shape is the result of wearing caused by wind and water currents over time. Sharply angular sand grains indicate young sand that has only been recently formed through the breaking down of rocks among other similar activities.
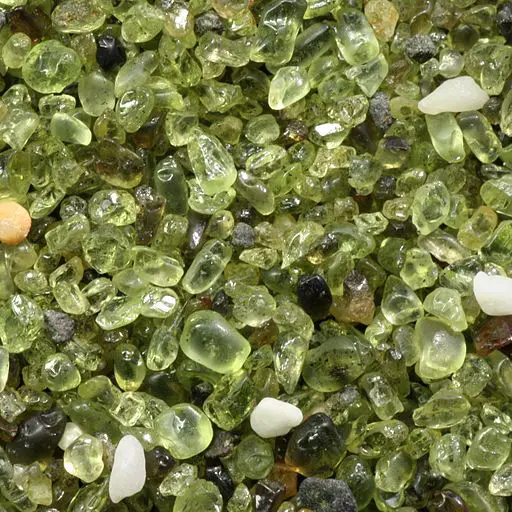
In addition to the size and general shape of sand grains, you may also notice that different grains of sand exhibit different colors. Some of the grains may appear translucent and shiny while others may appear black or gray. These differences give an indication of some of the components of these sand samples.
Whereas a translucent appearance indicates quartz to be the main component, black, gray, or dull color is indicative of basalt or magnetite as the main components. Pink, peach, or tan color indicates feldspar as a component of the sand granules while multi-colored sand grains (pink and white or gray, etc) are indicative of granite as the main component of the sample.
* Sand grains characterized by holes, spines and a variety of colors indicate marine life remains (coral, spines of urchins, shells etc) as the main components of the sand.
Conclusion
Like fossils found in different regions across the world, sand can also provide such information as where it was formed, how old it is, and some of the organisms residing in a given region. It's, therefore, a valuable field that students can enjoy while learning more about their surroundings and other regions across the world.
Return to "What looks Cool under a Microscope?"
Return to Fun Microscope Experiments
Return from Sand under a Microscope to MicroscopeMaster home
References
D. H. Krinsley and I. J. Smalley. (1972). Sand: The study of quartz sand in sediments provides much information about ancient geological environments.
Jenny Cook and Gene Williamson. (2006). Sediments Rock (and sometimes roll).
Pamela Borne Blanchard. Secrets of Sand.
Sea Grant Virginia and Virginia Institute of Marine Science Marine Advisory Services. New Views on Sand.
Links
https://sites.google.com/site/dougfosterprogramsite/arenology--the-study-of-sand
https://civiltoday.com/civil-engineering-materials/sand/233-sand-composition-types
Find out how to advertise on MicroscopeMaster!


