Chalk under a Microscope
Procedures and Observations
A Brief History of Chalk
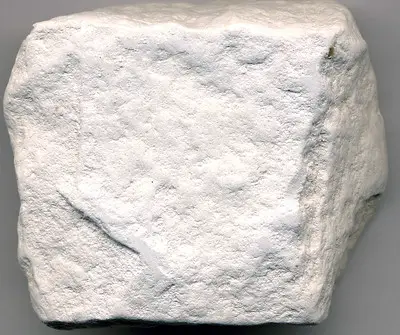
Chalk is a whitish (or gray) sedimentary rock mostly composed of calcium carbonate. Throughout human history, chalk has been used for a variety of functions ranging from art to painting houses.
According to some researchers, the majority of prehistoric cave paintings (between 40,000 and 10,000 BC) were made using chalk and limestone powders. Found in various caves in various parts of Europe, these paintings are evidence of early use of chalk by human beings.
During the 5th Century, chalk was used for the construction of roads (in addition to gravel and other elements) as well as the preservation of bodies among other uses in Rome.
In various parts of England, where it was described as a whitening powder by Anglo-Saxons, it had many uses, included in paints, primers, and plasters, etc. As such, it was particularly important for arts and decorations among many other uses.
Archeology studies have also shown it to have been used in India during the 11th and 12th Century, medieval Japan and other parts of Europe (Germany, Sweden, and Denmark, etc). In recent history, intensive chalk quarries have been discovered extending to various land boundaries, railways as well as tunnels, evidence that had many uses during the 19th and 20th Centuries (e.g. used to make chalks used in schools).
Today, some of the main uses of chalk include:
- As a component of cement
- For controlling soil acidity
- For making blackboard chalk
- As a building stone in some regions
- Production of steel, paper, and fertilizer, etc
Chalk Formation Process: Natural Chalk
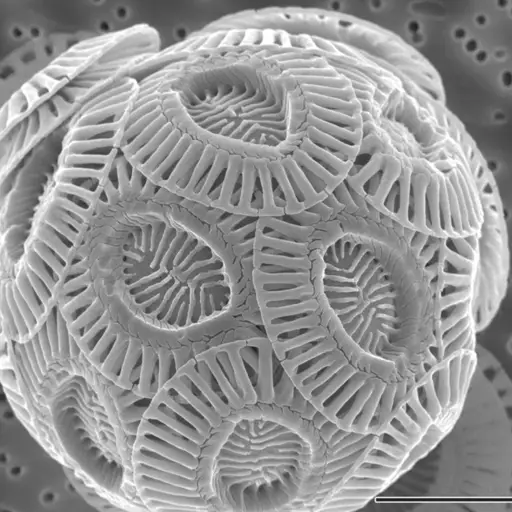
Chalk is mostly composed of calcareous nannofossils. As such, it consists of nannofossils and coccoliths (with coccoliths being the predominant component). In North Europe, research findings showed that over 90 million years ago, ooze (consisting of sub-microscopic particles) accumulated at the bottom of the sea and built up over the years to form the soft sedimentary rocks.
Over time, as a variety of marine organisms die (algae, foraminifera, etc), their remains sink to the bottom of the ocean where they accumulate to form ooze (various remains of these marine organisms). Here, however, it's worth noting that it is only when the majority of these organic materials consist of calcium carbonate that chalk will form.
For the most part, the carbonate is the product of foraminifera remains that sink and settle at the bottom of the marine environments. In the event that radiolarians and diatoms are the main components of this debris, then the ooze produced when these remains sink is silica which forms diatomite.
Although various marine organisms settle and accumulate on the seafloor to form ooze that builds up to form chalk, favorable conditions are necessary for chalk to form. The process is dependent on deep marine conditions that allow for the gradual accumulation of calcite shells of dead microorganisms (coccolithophores).
For this reason, chalk sedimentary rocks can be found in certain regions in the world associated with these conditions in the past (e.g. Nitzana chalk curves in Western Negev, Israel).
Apart from organisms that die in marine environments and settle on the seafloor, some of the remains are found in terrestrial environments and have to be transported to the sea where they sink and accumulate.
Some of the main transport mechanisms include:
· Rivers - About 85 percent of all sediments on terrestrial environments are transported to the sea by rivers
· Ice - About 10 percent of these sediments are transported in ice
· Wind- Only transports about 3 percent of terrigenous sediments to the sea.
* It can take years for particles on the sea surface to sink and settle at the bottom of the sea.
Early Study of Chalk under a Microscope
Although scientists understood the role of various marine organisms in the formation of different types of rocks (e.g. limestone rocks, chalk, and strata, etc), early microscopic studies of these rocks made it possible to determine the types of fossils they consist of.
In the 1820s and 1830s, scientists like Dr. Mantell discovered many shells covered with spines (as well as specimens of fish) in chalk which allowed them to deduce where they came from. Various species consisting of similar microscopic shells were identified in English chalk during this time period (by William Lonsdale). This led Londsdale, along with other scientists to conclude that the components of these rocks originated from marine environments.
Thomas Henry Huxley, an English biologist, and anthropologist was one of the scientists who studied the characteristics of this material under the microscope in the 1860s. In one of his lectures, Huxley explained that chalk is a compound consisting of lime and carbonic acid gas. Although it would not be possible to see the carbonic acid part of the compound by burning chalk, he suggested a simple experiment to demonstrate its presence.
A simple experiment to demonstrate the presence of carbonic acid in chalk:
Requirements
- Natural chalk
- Glass container
- Strong vinegar
- Metal file/knife/metal rod
- Container
Procedure
· Using a metal file, knife or rod, make a small amount of power from the natural chalk - You can store the powder in a container
· Pour a reasonable amount of strong vinegar into a glass container and quickly introduce a little amount of chalk into the glass container
Observation
Through this experiment, you will notice a bubbling and fizzing reaction that will ultimately slow down - This reaction is indicative of carbonic acid in the compound.
Apart from this simple experiment, Huxley also conducted microscopic experiments to study the structure of chalk. In this experiment, Huxley sliced chalk to make thin slices (thin enough to see through).
When he examined the slices under a microscope, Huxley noticed tiny granules with innumerable bodies imbedded in the matrix. The globules were described as tiny snowballs made from paper plates.
Chalk Microscopy
Microscopic investigation of chalk makes it possible to observe the main components of natural chalk. A number of techniques are used to prepare and observe chalk samples under a microscope.
Objectives
The main objective of these experiments is to observe the structure and main components of natural chalk.
By the end of the experiments, you should be able to:
- Prepare chalk samples for microscopy
- Identify various components of chalk
Making thin chalk slices
As is the case with various biological specimen (e.g. onion skin etc), rock slices should be thin enough to allow light to pass through. This may be achieved using a technique used for various fossils.
Requirements
- Sample of natural chalk
- Resin (epoxy or polyester)
- Container
- Diamond encrusted wafer blade saw or the slab saw
- Superglue
- Glass slide
- Finer grit (for smoothing the rock)
Procedure
· Place a sample of chalk in a container (a small piece of the rock is sufficient)
· Gently pour the resin (epoxy or polyester) into the container in order to fully submerge the sample - Gently pouring the resin will help prevent air bubbles from being trapped
· Allow the resin to harden so that the sample remains in place during the initial cutting
· Before cutting, you can draw straight lines on the surface of the resin to guide you during the cutting process
· Turn the saw on and use low-speed to make your first cut (Although a diamond-encrusted wafer blade is ideal for cutting, a slab saw may also be used)
· Once you have cut through the resin (along with the sample), smooth the cut surface of fine grits - This step serves to create a flat, smooth surface that will stick to the glass slide
· Using epoxy (of superglue) to glue the cut sample onto a glass slide and allow it to set (so that the sample is firmly held on the slide) - Make sure that air bubbles are not trapped
· Once the adhesive holds the sample in place, carefully cut the sample for a second time and try to make it as thin as possible - This step should retain a thin wafer mounted on the slide
· Hand grind the wafer (the thin slice) using fine grits until you have a very thin sample for microscopy - To get the ideal sample thinness, you can switch between the slide under the microscope and grinding it again until you get the ideal thinness
* A grinding wheel may also be used on the slice to make it smoother and thinner.
* A small amount of epoxy can be added on to the sample before gently covering with a glass slide.
Observation
When the slide is observed under a compound microscope, you will notice large white spots in the field of view. These spots represent the skeleton or calcite of the planktons. On the other hand, the black spots observed in the field of view are pores (sparsely located in the matrix). Depending on the sample, you may also observe micrites or cryptocrystals which are fine grains of carbonate (gray in color).
Under an electron microscope, the shells are much clearer and distinct from the other components of the chalk. Here, they appear as snowballs made up of several concave shells (These shells are characterized by unique patterns and resemble simple paper plates).
Washing and filtering the sample
The second method of preparing the sample involves crushing, washing and filtering the sample in order to obtain residues for microscopy.
Requirements
- Sample of natural chalk
- Container
- Water
- Filter (120 and 25micron filter)
- A piece of clean cloth/bag
- Hammer
Procedure
· Place a piece of the chalk in a cloth and fold the cloth so that the sample is contained
· Using the hammer, crush the sample into very little pieces/powder
· Wash the pieces/powder through a 120-micron filter so that the larger lumps are sieved out
· Pour the remaining milky liquid through another filter (25-micron filter) to obtain a sample that will be used for microscopy
· Wash the residue until the water runs clear
· Using a pipette, obtain the material retained from the sieve and place a small amount on a clean microscope slide
Microscopy
Once the sample has been prepared, the next part of the experiment involves observing the slide under the microscope.
This involves the following steps:
· Make sure that the stage is lowered before turning the turret
· Turn the turret of the microscope so as to set the lowest magnification objective in place
· Place the slide on the microscope stage and hold in place with the pair of clips
· Look through the eyepiece and gently turn the focus knobs (coarse and fine adjustment knobs) until the image is in focus (until you get a clear image)
· You can also switch to high magnification objective and record how the sample appears
Observations
For this method, using low objective magnification (X10 objective lens) will provide a better view of the sample. You should be able to see shells (some will be attached) as well as sponge sections and marine debris. By comparing several slides of samples from different regions, you will notice differences between the components of chalk observed under a microscope.
Conclusion
As mentioned, chalk is composed of a number of several components, most of which are remains of dead marine organisms. This composition varies from one region of the world to another resulting in slight differences between these natural chalks. This would, therefore, be a fun experiment for students that can be used to not only determine the main components of different samples of chalk but also learning where they came from.
Return to "What looks Cook under a Microscope?"
Return to Beginner Microscope Experiments main page
Return from studying Chalk under a Microscope to MicroscopeMaster home
References
Thomas Henry Huxley. (1868). On a Piece of Chalk.
Ida L. Fabricius. (2007). Chalk: Composition, diagenesis and physical properties.
Ian P. Wilkinson et al. (2008). The application of microfossils in assessing the provenance of chalk used in the manufacture of Roman mosaics at Silchester.
Richard Phillips. (1840). A Million of Facts, of Correct Data, and Elementary Constants in the Entire Circle of the Sciences and on All Subjects of Speculation and Practice.
Links
https://aaronrhleblanc.wordpress.com/palaeohistology/how-to-make-a-thin-section/
Find out how to advertise on MicroscopeMaster!
