Cork Cells Under the Microscope
Objectives, Preparation and Procedure
Background
Over 300 years ago, an English scientist named Robert Hooke made a general description of cork cells with the aid of a primitive microscope. This was actually the first time a microscope was ever put into use as he observed the little box-like structures with the microscope and cells.
Cork which is basically composed of dead tissues originates from the cork oak tree's outer bark. in the early 19th century, this observation led to the formulation of cell theory as it became widely accepted that all living things are made of cells.
It was also discovered that cells come in varying sizes and shapes and also perform varying functions, making up part of the cell theory.
While all cells in the body are not the same, they look very much alike with a striking resemblance because of certain intrinsic structures they share in common. With the aid of a microscope, it was discovered that most animal cells and plant cells have various components in common which are the nucleolus, nucleus, mitochondria, cell membrane, and cytoplasm.
As a matter of fact, Robert Hooke was incorrect in his thought that it's only plants that contains cells, and just as you will be observing soon, Hooke has observed only cell walls as the cells have dried out. The understanding of the basic nature of a cell is necessary to microscopy and to the study of life forms or biology.
See differences between cytosol and cytoplasm here.
Introduction
Cork or cork cambium (pl. cambia) is best described as a tissue in all vascular plants existing as part of the outer layer or epidermis. It is a lateral meristematic tissue responsible for the secondary growth in plants via the replacement of the epidermis in the stems and roots of the plants (1).
Cork cambium is present in herbaceous and woody dicots and some gymnosperms. Taken a more cursory look, cork cambium is one of the meristematic tissues of a plant which are a series of tissues that consist of some incompletely differentiated cells from which the plant grows. Its function is to produce cork which is a strong protective material.
The growth and development of the cork cambium tissue vary with the plant species in consideration. It also depends on plant age and conditions of plant growth, as can be seen from various surfaces of bark, which may be fissured, scaly, tessellated, flaking off or smooth.
Objectives
By the end of this activity you will be able to:
1. Observe the magnified structure of dead cork cells.
2. Apply the knowledge you acquire here to the general operation of a microscope.
Materials:
- Cork
- Coverslip
- Microscope Slide
- Compound microscope
- Sharp single-edge razor blade
Preparation
In this activity you will be observing cork cells with the use of a compound light microscope. Using the cork bits or dust in the bottom of the cork container gives you the opportunity to see clearly the individual cells.
Dip your finger in the container of cork shavings or cork dust and pick up a few and place on the slide for a wet mount. Or alternatively, cut cork slices that are thin enough to allow you to see individual cells. If the cork slice is thicker than necessary, it becomes difficult to see the layout of individual cells.
Place the cork on a paper towel or on several sheets of paper. Hold the cork firmly and using a razor blade, carefully slice off a thin cork section and be sure to create a very clean surface, making the cut section as thin as possible.
After cutting a cork slice that is thin enough for light rays to pass through it, prepare the slice into a wet microscope slide mount. This can be done by placing a small drop of water on a microscope slide, then add the cork slice on the slide and add another drop of water on the slice and cover with the slide coverslip.
The wet mount will help make sure the cork doesn't fly off the slide. The best place to look is along the thinnest edge of the slice.
CAUTION: Razor blades are sharp! To avoid cutting your fingers, slice away from them, not toward them.
At first, start with low power in viewing your slide. What you will be seeing is almost identical to what the scientist Robert Hooke saw with his low power primitive microscope about 3 and half centuries ago.
Switch your microscope to a higher power and identify the details you can clearly see now which were invisible in low power.
Procedure
1. Turn the revolving turret of the microscope so that the lowest power objective lens is clicked into the 10x position.
2. Place the carefully prepared microscope slide in position and keep in place firmly gripped with the clips.
3. Look through the microscope’s eyepiece and then move the focus knob carefully for the image to come into clear focus.
4. Slightly adjust the microscope’s condenser and amount of illumination for optimum light intensity.
5. Move the microscope slide around until the sample is in the center of the field of view. High illumination from a small angle to the top of the sample is also helpful.
6. With the focus knob, carefully place the image into clear focus and also readjust the condenser and amount of illumination for a clear image. Then note what you see with the x10 magnification.
7. Once the image of the cork sample comes into clear focus with the x10 power objective, you can then switch to the higher or lower objective to zoom in or out of the image for clarity. You can at this time, point the objective into different planes for better observation of the cork sample layouts.
8. When you’re done with the viewing, lower the stage, then click the objective into the low lens power and take out the slide.
Observation
A mature cork cell is a dead cell with cell walls made up of a waxy substance called suberin. This substance is highly impermeable to water and gases. Now depending upon the species of woody plant you have, the cork cells may contain traces of tannins, lignin, or fatty acids or the cork cells may just be filled with air and the thickness from one cell to the other may be different.
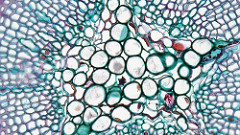
In microscopy with the x10 low power magnification, the cells are packed together closely and can be seen to be generally arranged in rows radially. Many details can be made out of the cork cells layout with this low power magnification.
Switching to a higher power magnification say x40, the separation between cells can be observed. This separation is believed to be caused by structures that arise from the cork cambium, known as lenticels. These lenticels or pore-like structures as can be seen in higher powers allowing for the exchange of gases between the outside environment and the stem of the plant.
Conclusion
In conclusion, when looking at the smallest piece possible with the microscope using the higher power objective, be sure not to look at the center of the cork sample but at the edge where you can see some light passing through the sample. Each one of these units that can be observed is one cork cell and it's only the cell wall that is visible because the cell has already dried out.
More Experiments
|
Pond Water Microorganisms like Plankton, a closer look at Diatoms, Amoeba, Euglena |
Check out Petri Dish with Agar - Preparation, Requirements and Procedure
Take a look at Beginner Microscope Kits to help you get started.
Return to Beginner Microscope Experiments Main Page
Return from Cork Cells under the Microscope to MicroscopeMaster Home
References
1. Junikka, L. (1994) "Macroscopic bark terminology". IAWA Journal 15(1): 3–45
2. Trockenbrodt, M. (1990) "Survey and discussion of the terminology used in bark anatomy". IAWA Bulletin, New Series 11: 141–166
Find out how to advertise on MicroscopeMaster!
![Cork Cells - By Berkshire Community College Bioscience Image Library (Gymnosperm Stem: Three Year Pinus) [CC0], via Wikimedia Commons Cork Cells - By Berkshire Community College Bioscience Image Library (Gymnosperm Stem: Three Year Pinus) [CC0], via Wikimedia Commons](https://www.microscopemaster.com/images/Gymnosperm_Stem_Three_Year_Pinus.jpg)


