Yogurt under the Microscope
Preparation, Requirements and Observation
Yogurt has been made and consumed for thousands of years, and is today recommended for effective regulation of the digestive system. Although milk from a number of animals (sheep, goat and water buffalo) can be used, it’s more popularly produced by using milk from cows. This process also involves the use of bacteria, which thickens the milk, giving it a tangy taste.
Yogurt is produced through a simple process referred to as fermentation. Here, the lactose in milk is fermented by rod-shaped bacteria to produce lactic acid. It is this acid that gives yogurt its characteristics.
Observing Yogurt under the Microscope
Requirements
- Microscopic glass slides
- Microscopic cover slips
- Yogurt sample
- Blotting paper
- Cotton swabs
- Methylene blue solution
Procedure
Without Using Stain
- Place a drop of distilled water on the microscopic slide
- Using a cotton swab/tooth pick, take a small drop of yogurt and smear it onto the microscopic slide (try having the smear at the central part of the slide and make a thin smear)
- Gently place the microscopic cover slip on the smear (use blotting paper to remove excess solution on the side of the slide)
- Place the slide on the stage of the microscope starting with lower magnification (40X) and move to higher magnification
Note** Yogurt bacteria are not bad, and are therefore safe to use.
Staining
- The staining process will also require the use of heat and methylene blue stain
- Place a drop of dilute yogurt solution on the microscopic slide and spread it to form a thin smear
- Allow the slide to dry in air (without using heat) to form a thin film
- Quickly pass the slide three times above the flame (a bunsen burner can be used) to fix the bacteria. The side with film should be up
- Allow the slide to cool to room temperature
- Add a drop of methylene blue stain on the film and allow it to settle for about 2 minutes
- Gently rinse excess stain in a beaker of water
- Place a cover slip on the film and observe under the microscope starting with low magnification
Observation
The two types of bacteria observed are:
- Lactobacillus bulgaricus (rod shaped)
- Streptococcus thermophilus (spherical)
Unstained Slide
The student will be able to see rod-like organisms, which may be in clusters.
Stained Slide
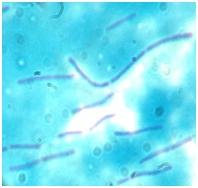
With a stained slide, students will be able to observe light bluish rod-like organisms (individual bacillus or in clusters) moreover, the student may observe organisms that are round in shape (cocci). These may be in clusters, isolated or in pairs.
While staining may appear a little more complicated than the former, it would prove to be an easy procedure if the steps are followed appropriately. This would also be an important process, which would allow the student to compare stained and unstained yogurt slides.
With unstained slides, students are more likely to see and identify the bacteria if they are in clusters rather than single, individual cells.
On the other hand, in bright-field, closing the condenser iris diaphragm will also make the bacteria appear darker, allowing for easier identification.
Conclusion
This
is a fun and interesting experiment that will allow the student to learn more
about yogurt. It is an opportunity to learn the different between stained and
unstained slides as well as the different types of bacteria that are used to
make the yogurt they drink.
Although yogurt bacteria are safe to handle in the laboratory, safety is still emphasized given that students will still come in contact with glass slides and stains. Gloves should therefore be used at all times while avoiding clutter in the working space.
Be sure to try viewing Onion Cells, Leaves and Cheek Cells under the Microscope too!
See Also: More advanced - Bacteria under the Microscope
Check out our page on Beginner Microscope Experiments here.
|
Pond Water Microorganisms like Plankton, a closer look at Diatoms, Amoeba, Euglena |
More ideas below:
Check out Petri Dish with Agar - Preparation, Requirements and Procedure
Return from Yogurt under the Microscope to MicroscopeMaster Home
Find out how to advertise on MicroscopeMaster!


